

Questing has always been one of my favorite parts of playing Old School Runescape. While I also love spending hours mining and smithing gear for the Grand Exchange, the MMO has always done an excellent job of creating unique quests.
They frequently have fun stories of experiencing as well as feature excellent new mechanics and ideas that aren’t anywhere else in the game. Since I’m also a big H.P. Lovecraft fan, I’ve always had a weak spot for the Horror From the Deep quest in OSRS.
Key Info Up Front
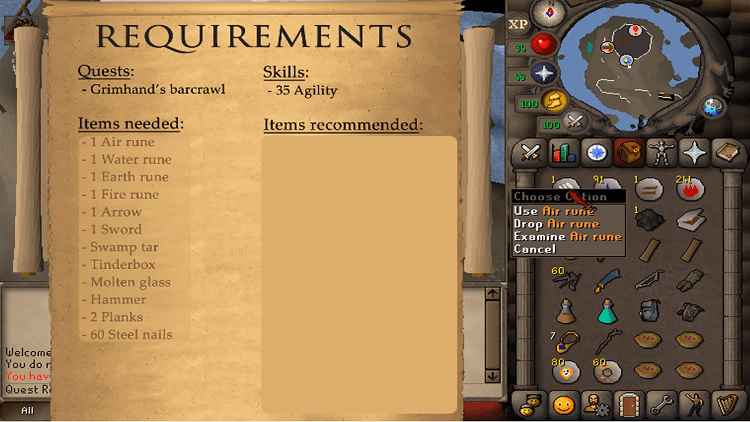
- Base Requirements: Agility Level 35, Completion of the quest Alfred Grimhand’s Barcrawl
- Recommended Requirements: Combat Level 50, Magic Level 13, Prayer Level 40
- Rewards: 2x Quest Points, 1x Damaged Book, Lighthouse general store access, 4,662.5 Magic experience points, 4,662.5 Strength experience points, 4,662.5 Ranged experience points
- Quest Length: Short
- Members Only: Yes
Horror from the Deep Overview
This quest is officially labeled as being short and of Intermediate difficulty level. This means that it only has a few relatively quick stages to complete if you have the items required ahead of time. Intermediate difficulty also requires you to have some decently leveled skills and combat ability before attempting it.
I recommend getting to at least Combat Level 50 before attempting the quest, and make sure to bring plenty of food and some good equipment along.
The quest itself is heavily inspired and reminiscent of the works of horror author H.P. Lovecraft. It starts when the player is told that the keeper of the Lighthouse by the Fremennik Province, Jossik, has gone missing under mysterious circumstances.
The player is tasked with investigating his disappearance and figuring out exactly what happened to him. While doing so, the player discovers a nest of terrifying monsters underneath the lighthouse itself and has to intervene to stop them from taking more people.
How to Start Horror from the Deep
Before you can accept this quest, you must complete the quest Alfred Grimhand’s Barcrawl. This quest takes a while to complete, but it mostly features a lot of travel around the map.
It can be started by talking to the guard at the entrance of the agility training course near the Barbarian Village. Then, you must travel to various bars around the map to drink specialty drinks from them. It is a fun but not overly tricky quest.
The second requirement for starting this quest is to reach an Agility Level of 35. If you need to farm up to this level, you can start by heading to the Gnome Stronghold Agility Course.
This is the starter course that doesn’t have any requirements to access. To level your Agility, you just have to run around the system completing obstacles repeatedly.
Once your Agility Level reaches 5, you have the option to train at the introductory Shayzien Agility Course or the Penguin Agility Course at level 30. If you go to either of those obstacle courses, make sure to bring food to heal, as failing obstacles at them will damage you.
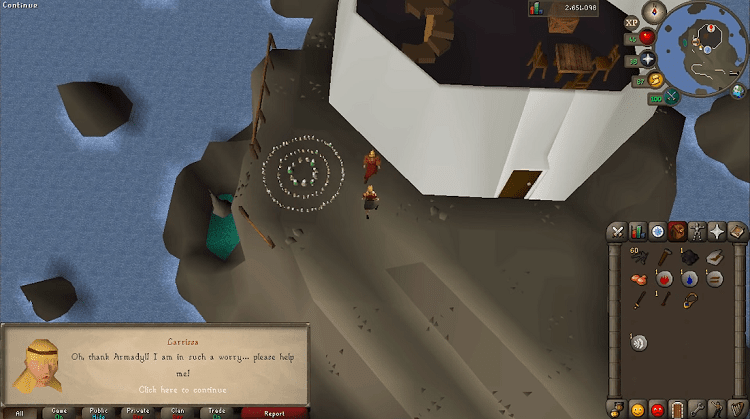
Once you meet both requirements, you can start the quest. To do so, you’ll need to travel to the lighthouse. It can be found on the shoreline to the north of the Barbarian Outpost. There you’ll discover Larrissa, and if you talk to her, you’ll be filled in on the details and get to start the quest.
Items Required to Complete Horror from the Deep
If you want to go through the quest for yourself, you should skip this section, as gathering the items required for the quest plays into the experience.
However, you may instead want to get all the required items before starting it so that you can progress through it smoothly and without having to stop to grab items. The items you need are each listed below and a quick description of the fastest way to get your hands on them.
Fire Rune
If you spent any time grinding for early combat levels, you’ve probably gone some Fire Rune drops from the goblins near Lumbridge. If you don’t have any leftover, you can craft them with a Runecraft Level of 14 or buy one for six gold.
Air Rune
You may also already have some extra Air Runes sitting around since low-level enemies are very common drops. If you don’t, you can craft one with a Runecrafting Level of one or buy one for five gold.
Water Rune
Water is another standard drop you may have gotten along the way, but if not, you can make one with Runecraft Level 5. If you don’t want to spend the time doing that, you can buy one for only five gold.
Earth Rune
You may also have an extra Earth Rune while grinding for combat levels. If you don’t have one taking up space in your bank, you can buy one for five gold or craft one with Runecraft Level 9.
Sword or Longsword
Before starting this quest, bring either a sword or a longsword that you don’t mind losing. This can be any sword other than the Rusty Sword or Prop Sword, so you can use an extra that you already have or just craft or buy a cheap bronze one.
Arrow
Like the above sword, you’ll need to get an Arrow that you don’t mind losing. This can be any arrow other than an ogre arrow or a training arrow.
Molten Glass
Molten Glass is a bit more complicated to get. Thankfully, you only need to have Crafting Level 1 to make it. To do so, you need to gather a Bucket of Sand and Soda Ash, which can then be combined at a furnace.
Both of these can be purchased for 50 gold. Or, you can make a Bucket of Sand by using a bucket on a sand pit and get Soda Ash by using seaweed on a fire.
Tinderbox
Tinderboxes can be bought from general stores for a single coin if you somehow don’t already have one.
Hammer
Hammers are also purchased at general stores for a single gold coin.
60x Steel Nails
If you have Smithing Level 34, you can craft these with only 4 Steel Bars. Otherwise, you can buy them for a little over 1,000 gold.
2x Planks
When you start this quest, you will be near the Barbarian Village. Thankfully, two plants spawn just to the north, so you can grab those along the way and not waste time making your own just for the quest.
Swamp Tar
Lastly, you’ll need to get a single unit of Swamp Tar. This is most easily reached by finding some in the Lumbridge swamp since it is a low-level area.
Horror from the Deep Recommended Gear
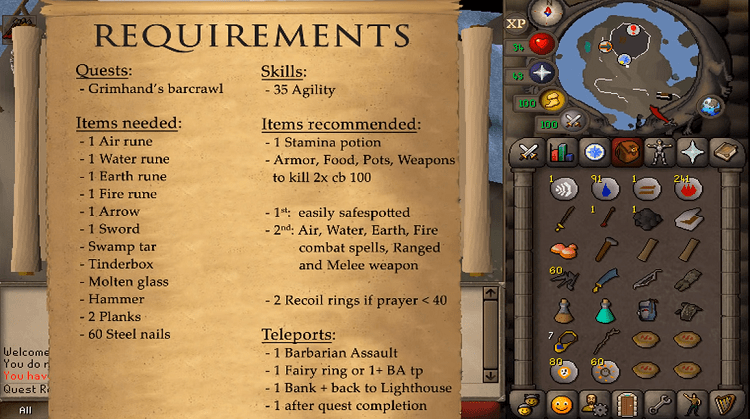
Depending on your skill levels and abilities, you may want to approach this quest in your way, but I have a list of gear and skills that I recommend taking with you.
This can serve well as a baseline to build your approach on top of. To start, you should have a Combat Level of at least 50 to ensure you can survive the combat encounters sprinkled throughout the quest.
I also highly recommend having Prayer Level 40 so you can use the Protect from Missiles prayer. This will come into play while fighting the quest’s main boss.
You can beat this quest without your Prayer being so high, but it will be much more difficult. If you need to level up your Prayer quickly, you can complete some of the many quests that reward Prayer experience points or farm by slaying giants and burying their bones.
Since there is a solid boss in this quest, you should equip yourself with some reliable armor options and bring plenty of food to heal during the fights.
It also can be helpful if you have a method to travel fast to the fairy ring outside the lighthouse or a Games Necklace to get to the Barbarian Outpost nearby.
Horror from the Deep Walkthrough
The quest itself can be split into four segments of roughly equal length. If you want to go through the search naturally for yourself, you should skip this section, as I’ll be going over how to complete each Horror From the Deep section. For this section, I’ll also let you know which of the required items are needed to progress through it.
If you want to split it into chunks or need to wait a bit to get some of the resources, you can go through some of the quests and know when to stop and come back later.
Starting the Quest
Items Used During This Section: 60x Steel Nails, 1x Hammer, 2x Planks
To start the quest, you’ll have to reach the Lighthouse. It can be found along the shoreline north of the Barbarian Outpost location. Outside of the Lighthouse, you’ll find a fairy ring as well as Larrissa, the girlfriend of the Lighthouse keeper. You begin the quest by talking to her as she tells the player she is worried about her boyfriend.
The light of the Lighthouse has been out for a while, the door is locked, and she hasn’t heard from him. So, she asks the player to help her by going to her cousin, who has a spare key for the lighthouse. Larrissa also asks the player to help her get word to her family, who lives on the other side of a nearby broken bridge.
I recommend starting with finding the cousin first, and Larrissa tells you that he left his home to pursue improving his Agility. So, head south and cross the basalt platforms to reach the Barbarian Outpost, where you can find her cousin Gunnjorn by the agility course.
Talk to him, and he’ll give you his spare copy of the key without any fuss once he hears that Larrissa needs it.
Then, you’ll want to head to the east of Larrissa to work on getting the bridge fixed. Note that you’ll have to cross a working bridge to get to the broken one, so don’t get confused when you head east and first find a perfectly working bridge.
For this bridge, you’ll need to repair each side of the hole with one regular plank and 30 Steel Nails. It is important to note, however, that when you improve the bridge it won’t look any different for some reason, but you’ll be able to cross it without jumping.
I recommend checking your quest log to make sure it says that you finished repairing the bridge, just to double-check. Then, you need to return to Larrissa, and she’ll tell you it is time to go into the lighthouse and repair it.
Re-Lighting the Lighthouse
Items Used During This Section: 1x Molten Glass, 1x Swamp Tar, 1x Tinderbox.
When you first enter the lighthouse, you’ll be placed into an instance of its interior with only Larrissa to keep you company. The first room that you enter will be an utter mess.
Its furniture is destroyed, blood splatters cover the floor and walls, and deep scratch marks are everywhere. Larrissa advises that you find some documentation of Jossik’s regarding how to repair the lighthouse and to do that, you’ll have to head up to the second floor.
The second floor is mainly reminiscent of the first but has some bookshelves you should search through. In the bookcases, you will find multiple journals and books that fill in the backstory of what is going on at the lighthouse.
This is similar to the narrative device frequently used by H.P. Lovecraft in his short stories and helps you understand what you’re doing.
These books will explain how Jassik came to work at the lighthouse and what happened to him. It will also inform you of strange creatures that the lighthouse’s old keeper believed lived under the lighthouse called Dagannoth. He says that they are sealed behind a magical door with six runes on the front of it that magically contains them.
Most important for now, however, is the lighthouse manual that describes how to maintain the lighthouse’s light. Once you have that book and have taken the time to read the others, head to the top floor of the lighthouse so that you can repair its light.
To do so, you’ll first need to use the Molten Glass on its lense to fix some cracks there. Then you can use the Swamp Tar to fill in the light’s fuel canister before finally lighting it with your Tinderbox.
The Door and its Runes
Items Used During This Section: 1x Arrow, 1x Sword, 1x Fire Rune, 1x Water Rune, 1x Air Rune, 1x Earth Rune.
If you read the journals you found on the second floor of the lighthouse, you’ll have learned about the iron door in the lighthouse’s basement that keeps a strange species of monsters trapped behind it. The door can be found by going down the iron ladder to reach the basement.
When you reach the bottom of the ladder, you’ll find yourself at the beginnings of a cave system. Follow it briefly, and you’ll see the iron door you’ve read about. It will have six symbols surrounding an aggressive face with sharp teeth. You’ll have to use the six items needed for this section at the door.
They each are associated with one of the symbols on the door, and once you use all of them, it will open. If you have a stack of the runes to cast magic, later on, you should know that if you use the stack on the door, it will only use one of them.
At this point, you’re about to reach the final fights of the questline, so make sure that you are well equipped and ready to go. If you’re going to use magic, bring plenty of runes, especially those used for elemental spells. If you take a melee approach, you’ll want at least rune armor and weapons, or better if you can manage.
The Final Fights
Once you open the door, head through it and down the nearby ladder. At the bottom of the ladder, you’ll find Jossik, so have a quick chat with him. Right after you suggest getting him out of there, you’ll be attacked by a level 100 dagannoth.
It will only use melee attacks, so if you have high enough Prayer, you can use Protect from Melee to help you get through it.
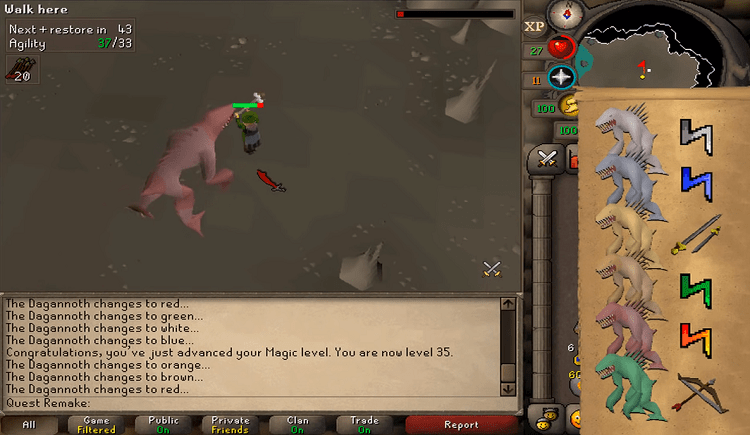
After you defeat the dagannoth, however, Jossik reveals that it isn’t the monster that attacked him but just one of its children. This kicks off a cutscene of the Mother Dagganoth rising out of some nearby water, kicking off the quest’s boss fight. During the fight, Mother Dagganoth will cycle through colors.
Each color has a type of damage associated with it, and you’ll only be able to deal damage to her with the correct type of attack. If you don’t have the resources to cover each color and its associated attacks, you can still finish the fight, but it will take much longer. The colors and their associated attacks are:
- Blue: Water spells
- Brown: Earth spells
- Green: Ranged attacks
- Orange: Melee attacks
- Red: Fire spells
- White: Air spells
If you have high enough Prayer you can use the Protect from Missiles prayer to help mitigate the damage you’ll take from her. Otherwise, there are some stalagmites in the room that you can squeeze behind to give yourself some space to eat food and recover.
If you have any problem noticing the color switches, you can also watch the chatbox in the bottom left corner of the game because they will be announced there and the boss’ model is visually changing.
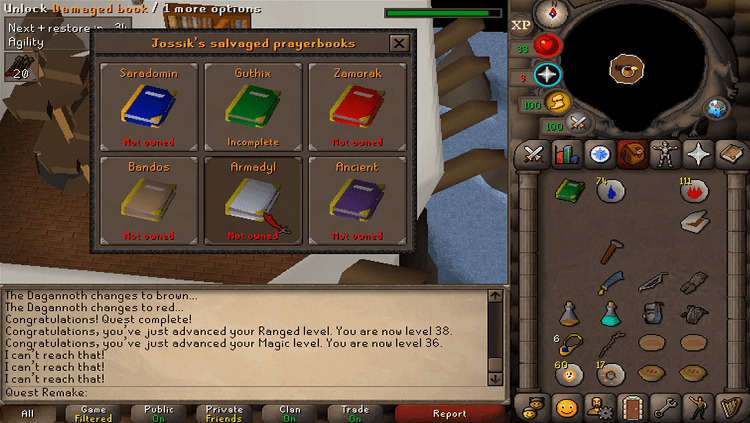
Once you kill the Mother Dagganoth, the quest will be completed, and you’ll receive a Rusty Casket and a quest completion scroll. You then have to talk to Jossik to help him return to the lighthouse above. Once you’re there with him, you can give him the Rusty Casket to be rewarded with your choice of Damaged Book, detailed below.
Horror from the Deep Rewards
Once you finish Horror From the Deep, you’ll also be given a solid slate of rewards. Because of the quest’s length and difficulty you’ll be rewarded with two Quest Points and 4,662 experience points in the Strength, Ranged, and Magic skills.
You’ll also be given your choice of Damaged Book when you return the Rusty Casket to Jassik. When he gives you the Damaged Book, you’ll have three choices: the Holy Book, Unholy Book, or Book of Balance.
These books are each associated with a different god in OSRS lore, Saradomin, Zamorak, and Guthix respectively. Whichever ones you don’t choose from Jassik will be available to purchase from him for 5,000 gold each and three other Damaged Books.
These Damaged Books are items that can be equipped in your shield slot. Each book has different bonuses that it grants you once you obtain four pages that can be put into it by completing Treasure Trails. The effects of each book on top of increasing your Prayer Level by five are:
- Book of Darkness (Ancient): Increases the damage of your attacks with Magic by 10.
- Book of Law (Armadyl): Increases the damage of your attacks with Ranged by 10.
- Book of War (Bandos): Increases your Strength Level by two.
- Book of Balance (Guthix): Increases the damage of your attacks with Magic, Ranged, Stab Weapons, Slash Weapons, and Crush Weapons by four, as well as your defense against all types of damage by four.
- Holy Book (Saradomin): Increases your defense against all types of damage by eight.
- Unholy Book (Zamorak): Increases the damage of your attacks with Magic, Ranged, Stab Weapons, Slash Weapons, and Crush Weapons by eight.
FAQs
Question: How do I Safespot the Horror from the Deep?
Answer: You can safespot during the boss fight by walking behind the stalagmites in the cave. It won’t be able to hit you with ranged or melee attacks while you are behind them, but getting back there may take a few attempts.
Question: How Do You Get the Damaged Books in OSRS?
Answer: You can purchase all six Damaged Books from Jossik after finishing the Horror From the Deep quest. You’ll get one for free from completing the quest, but the others each cost 5,000 gold.
Question: How Do I Get the Lighthouse Key?
Answer: You get the lighthouse key by traveling to the Barbarian Outpost. You will find an NPC outside of the agility training arena there named Gunnjorn. Talk to him, and he’ll give you the key without any fuss.
Conclusion
The Horror From the Deep quest has stayed with me in the years since I first played it because of how different it was from other quests in OSRS. It has some entertaining story elements, unique themes, and a fun boss fight that can be pretty challenging.
So, if you want to experience a great piece of OSRS content, you can do much worse than Horror From the Deep.
Looking for more interesting readings? Check out:
- Violet Is Blue RS3 Guide
- Ring Of Wealth OSRS Guide
- Smoke Devil OSRS Guide [2022]: The Mutant Cousin Of Dust Devils
- Combat Bracelet OSRS Guide
- Zulrah Guide - October 22, 2022
- Tempoross OSRS Guide - October 15, 2022
- Calisto OSRS Guide - October 15, 2022